BEST PLACE FOR WEDDING SHOOT

Yes You Can Take These Wedding Photos in Malaysia

Not every wedding couple can afford to take their pre-wedding photos in Paris, or Prague, or catch the cherry blossoms in Japan.
But as these photos show, you can save on overseas travel costs (also known as destination wedding photography), and still create jaw-dropping wedding photos in Malaysia. All you need is a photographer with a great eye, and a few tricks up his/her sleeve.
If you need more reasons to have your pre-wedding photoshoot in Malaysia, look no further. These shoot location ideas come from our recommended photographers, along with reviews from some of their satisfied customers 

1. FRIM, SELANGOR

Pre-wedding photoshoot in Malaysia (FRIM, Selangor). Photo by TCW Photography


2. PANTAI MORIB, SELANGOR

Pre-wedding photoshoot in Pantai Morib, Malaysia. Photo by Afnan Omar Photography
“Exceptional results” – Ahmad Farith


3. ANDAMAN RESORT, PULAU LANGKAWI

Pre-wedding photoshoot in Langkawi, Malaysia. Photo by Stories.my

Pre-wedding photoshoot in Langkawi, Malaysia. Photo by Stories.my
“The quality of their photos came out beyond perfect. I had two weddings in different countries and had two different photographers and I must say that Stories just did it the best. They live up to their reputation of being one of the best :)” – Pauline Heng


4. MORE LANGKAWI

Pre-wedding photoshoot in Langkawi. Photo by Peter Tan Photography


5. EVEN MORE LANGKAWI

Pre-wedding photoshoot in Langkawi. Photo by Alextan Artworks
Honestly, someone should write an article about how to plan a Langkawi wedding shoot, since there are so many. Oh wait, someone already did ðŸ™‚


6. PENANG

Pre-wedding photoshoot in Penang, Malaysia. Photo by Edwin Tan Photography
“Definitely one of the most consistent photographers in the industry as well as reliable. You definitely will not regret hiring him.” – Mark Leo


7. MORE PENANG

Pre-wedding photoshoot in Penang. Photo by Victor Hew Photography


8. IPOH

Pre-wedding photoshoot in Ipoh, Malaysia. Photo by Eyeshot Studio
Photo at The Banjaran Hotsprings Retreat by Eyeshot Studio
“Professional and experience photographer, expert in outdoor shooting” – Grace Chong


9. MORE IPOH

Pre-wedding photoshoot in Ipoh, Malaysia. Photo by Bridal Collection


10. SEKINCHAN, SELANGOR

Pre-wedding photoshoot in Sekinchan Selangor. Photo by Aaron Chin Photography


11. MORE SEKINCHAN

Pre-wedding photoshoot in Sekinchan Selangor. Photo by Daren Chong Photography
“Very professional and creative” – Germaine Teoh


12. CAMERON HIGHLANDS, PAHANG

Wedding fashion photoshoot in Cameron Highlands. Photo by Bridal Concept
“Provided excellent service, friendly and very helpful. Job are done professionally. Basically they solve our problems rather than giving us problems. By the way, they were our dedicated bridal shop for my wedding. Thumbs up guys” – Regina Lim


13. MORE CAMERON HIGHLANDS

Pre-wedding photoshoot in Cameron Highlands. Photo by Keda.Z Feng


14. TANARIMBA, JANDA BAIK, PAHANG

Pre-wedding photoshoot in Tanarimba, Pahang. Photo by Gallerie CK


15. MELAKA

Pre-wedding  photoshoot in Malacca. Photo by TCW Photography


16. LAKE GARDENS, KUALA LUMPUR

Pre-wedding photoshoot in Kuala Lumpur. Photo by Irvin Studio
“Irvin was my Actual Day photographer, 1 of the most satisfied memory I had for my wedding. The photos he took are simple yet capturing the most natural and memorable moment that you get to look back at what you had missed on the busiest day of your life.” – Phoevien Teng


17. MORE KUALA LUMPUR

Pre-wedding portraits in Kuala Lumpur. Photo by Emotion in Pictures
“One of the best investments my husband and I made for our wedding was booking Andy as our photographer or rather, our momentkeeper. True to the phrase, Emotion in Pictures, Andy has a true gift for capturing emotions in even the simplest gestures; in doing so, watching the slideshow and the pictures from our wedding helped us to relive them over and over again” – fsimone


18. EVEN MORE KUALA LUMPUR

Pre-wedding photoshoot in Kuala Lumpur. Photo by Jenny Sun Photography
“We were very impressed after our initial meeting with Jenny as she was so down to earth and extremely helpful. In fact, she was making it hard as she was giving us too many new ideas and suggestions. Shooting day was a breeze as Jenny had a very clear vision of the outcome she wants, but at the same time allow us to be ourselves in the photos. Will totally recommend her to anyone wanting a Pre-Wedding Shoot.” – Andrew Low


KAI WONG ADVENTURES INTO THE WILD ON NAT GEO WEB SERIES


YouTuber Kai Wong is known for his passion for photography and expansive knowledge of gear and equipment. But now, he can throw in some experience with nature photography, after adventuring into the wild to photograph coyotes feasting on prey.
In Nat Geo WILD‘s newest online series, ‘Untamed,’ Wong joins host and nature photography enthusiast Filipe DeAndrade, in the April 11 episode ‘Untamed Coyotes.’ In this episode, DeAndrade shows Wong what wildlife filmmaking is all about with a trip to Bosque del Apache, located in San Antonio, TX. This location is home to one of the most biodiverse population in the U.S., and in this special episode, DeAndrade introduces Wong to the coyote.
In the episode, Wong and DeAndrade camouflage themselves in a tent and photograph thousands of snow geese flying overhead, as the coyote predator hunts on the ground below. Wong even experiences the unfortunate, but natural, predator-prey relationship, as he and DeAndrade watch an injured bird succumb to the coyote.
DeAndrade said Wong was a lot of fun to work with on this particular shoot, especially since nature photography isn’t something he has tackled before.
“I’ve always admired his work and thought he might be interested in seeing a different view from behind the lens,” DeAndrade said. “He’s also a crock pot of a good time. Ultimately, we knew it would be fun.”
Since March of this year, DeAndrade has taken audiences on nature shoots involving monkeys vs. gatorsdolphins hunting for fish, and so many more fun, exciting episodes. DeAndrade believes we all have a connection with nature, however, we have replaced this connection over time, and he wants to encourage his viewers to “let the wild out.” With photography, he wants to capture the beauty of nature and make the audience fall in love with it. By doing so, he believes this love will make people more inclined to protect it.
“I’ve been fortunate to document wildlife in many parts of the world with Nat Geo WILD and the truth is that what we have in the U.S. rivals anywhere else,” DeAndrade said. “I want to show how amazing our country is and motivate people to get out there and have as much fun as we are.”

THE REALITY


Taking an image, freezing a moment, reveals how rich reality truly is.

BEST CAMERA BUYING GUIDE – WHAT'S THE RIGHT CAMERA FOR YOU?

Generally you need to think about two things when you're buying a camera: how much you're able to spend and how you're going to use it. It's a tough choice if you're new to camera buying, so here's a quick guide to the different types of camera you can buy.

BEST COMPACTS AND BRIDGE CAMERAS

If you're looking for the best cameras for casual use and don't want to fuss about with settings before hitting the shutter button, a compact camera is probably the best fit for you. There are still plenty of cheap and cheerful compacts out there, but higher-end models also cater for the enthusiast.

Sony RX100 IV 9
The Sony RX100 is a good example of an advanced compact for enthusiasts

There are numerous kinds of quality compacts, too. You'll find chunkier advanced compacts that give you good manual control, and simpler ones that focus on providing a higher-end sensor and lens optics for better image quality and ease of use. 
Bridge cameras are something between a compact camera and an interchangeable-lens system camera. They have permanent, generally very long zoom lenses and a similar feel to a DSLR. But bridge cameras mostly have sensors that are of a similar size to those in compact cameras, producing photos similar in quality.

BEST MIRRORLESS CAMERAS

Bridging the gap between compact cameras and DSLRs are mirrorless cameras, often also referred to as compact system cameras (CSC). Expect these types to offer an excellent balance of convenience and image quality, though at the very top end we're beginning to see CSCs that match or even exceed similar DSLRs. Sony's full-frame A7 II series is a good example. 
FujiFilm X-T2
The Fujifilm X-T2 is one of the most popular and highly-regarded mirrorless cameras

Within the CSC category, there's a number of different types of sensor used, each giving quite a different experience. Nikon's CSCs use 1-inch sensors that provide lightning-fast shooting and dinky camera bodies, but are not the best for low-light performance and don't achieve a shallow depth of field for blurring the background or foreground. Olympus and Panasonic use Micro Four Thirds-size sensors, providing a middle ground and some outstanding and affordable lenses.
The largest sensors you'll find in affordable CSCs are APS-C ones, used in cameras from Samsung, Fujifilm and Sony. Of course, Sony has now gone even further, adopting full-frame sensors in the top-end A7 II range. These provide the best image quality among CSCs, rivalling pro DSLRs.

BEST DSLRS

DSLRs remain the professional's choice. While CSCs compete well in the consumer market, professionals who need top-quality lenses and reliable performance still mainly use DSLRs. 

DSLRs are still the no.1 choice for professional photographers

This is particularly true for full-frame cameras, where Nikon and Canon both offer some outstanding options. There are some good cheap DSLRs as well, though, so there's plenty of choice and a huge number of lenses to invest in.


10 Tips to improve your photo by using iPhone camera

Some people work for years to master iPhone photography shooting and editing techniques. But with a few simple tricks you can start taking much better photos today! In this tutorial you’ll discover ten quick and easy iPhone photography tips that will significantly improve your iPhone photos.
iphone-photography-tips-1

1. Keep Your Photos Simple

Steve Jobs used to say, “Simplicity is the ultimate sophistication.” And he was clearly onto something.
New photographers often overcomplicate their photos. But too many details can distract the viewer, making it hard to create a beautiful and harmonious composition.
iphone-photography-tips-26
One interesting subject is all you need to create a memorable photo. And it’s much easier to get the composition right when your photo has just one subject.
Don’t worry if most of your photo is filled with empty space. In photography we call this “negative space” and it’s a great way of making your subject stand out.
iphone-photography-tips-2
Simple, minimalist compositions are also ideal for sharing on social media. If you share your iPhone photos on Instagram or a similar photo-sharing network, people will be viewing your photos on the tiny screen of their phone.
As a result, much of the detail you have in your photos will be lost to the viewer. Keeping your photos simple will allow your audience to enjoy them more.
iphone-photography-tips-27
Creating clean and simple compositions is one of the easiest yet most powerful iPhone photography tips you can learn.

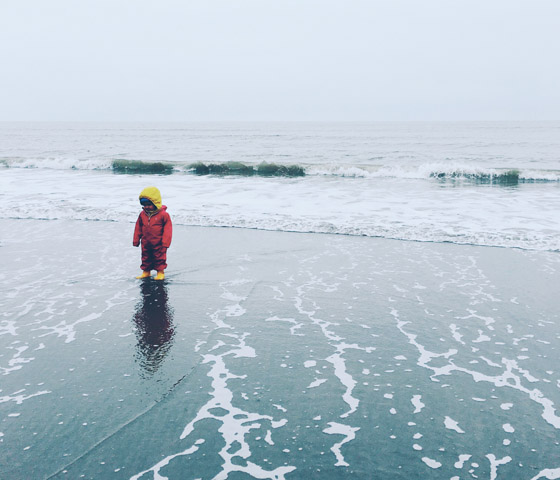
2. Shoot From A Low Angle

The majority of iPhone photos are shot from the chest height of a standing adult. This may be the most convenient way of taking a photo, but there are usually more creative options!
You can easily improve your photos by finding a more interesting perspective to shoot from. Often the best way to do that is to simply shoot from a lower angle.
IMG_0570
There are three great reasons to take your photos from a lower angle. First, your photos will automatically become more intriguing because they allow the viewer to see the world in a new way.
Second, by shooting from a lower angle you can show your subject with nothing but the sky in the background. This is a good technique for removing unwanted distractions and making your subject stand out.
iphone-photography-tips-11
A third benefit of taking photos from a low angle is that you can show interesting details in the foreground that would otherwise be lost.
This is particularly useful when you want to capture ripples or reflections in water. Try kneeling or even lying on the ground to use this terrific iPhone photography tip!
iphone-photography-tips-13

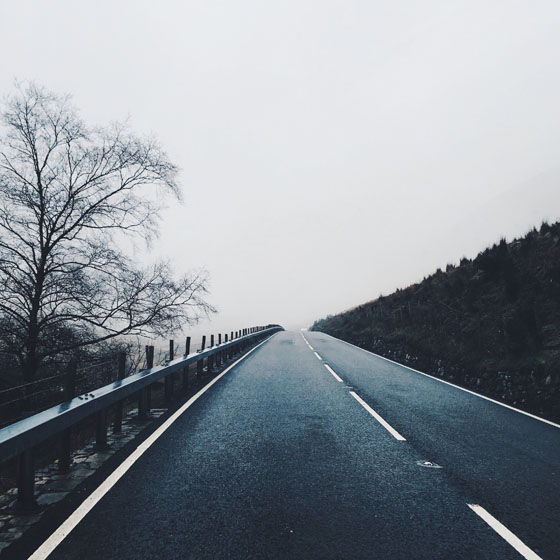
3. Show Depth In Your Photos

Most photos look better when they convey a sense of depth as it helps to draw the viewer’s eye into the scene. This is especially important in landscape photography.
There are several easy techniques that you can use to create depth in your photos. One of the most powerful methods is to incorporate leading lines into your composition.
iphone-photography-tips-22
Roads, paths, railway tracks, rivers, fences, ripples in the sand, or the water’s edge at the beach make excellent leading lines.
Just ensure you compose the photo so that the line leads from the foreground into the distance. This will draw the viewer through the scene and make your photo more engaging.
iphone-photography-tips-20
Another technique for creating depth is to include something of interest in the foreground, such as rocks, flowers, leaves or any other interesting objects that you can find.
iphone-photography-tips-24
If you’re struggling to incorporate foreground objects into your composition, try shooting from a lower angle.
If possible, try to include subjects in the foreground, middle ground and background. By following this simple iPhone photography tip, you’ll immediately make your images more three-dimensional.
iphone-photography-tips-23
A third way of creating a sense of depth in your photos is to use something in the foreground to frame the scene.
Archways, window frames, and even overhanging tree branches can be used as framing objects.
iphone-photography-tips-28
Shooting through a frame helps to draw the viewer’s eye through the frame to the scene beyond, thereby creating a stronger feeling of depth in the photo.

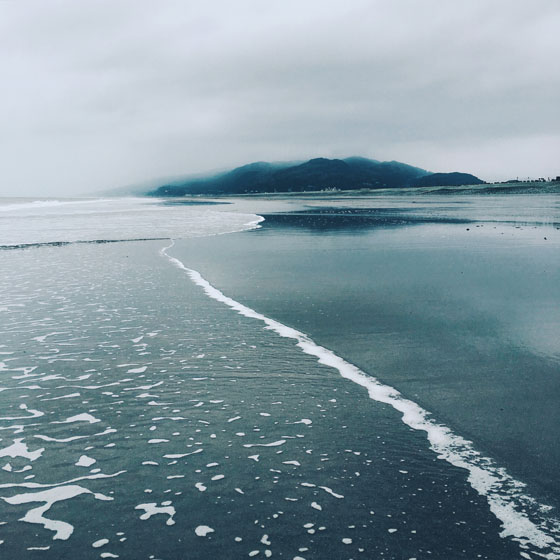
4. Align Your Subjects Diagonally

If you have multiple subjects in your scene, try aligning them diagonally within the frame. This will usually create a more balanced and harmonious composition.
iphone-photography-tips-30
If everything is positioned on one side of the frame, your photo can end up looking lop-sided and unbalanced.
With certain kinds of photography, such as still life and portraits, you have control over where you place the subjects within the scene.
So when shooting these kinds of photos, take a few moments to move the main elements so that they’re positioned diagonally within the frame.
iphone-photography-tips-31
In other situations you won’t have any control over where your subjects are positioned. For example, in landscape photography the objects are usually static and too big to be moved.
In environments like this, you’ll need to move around the scene to find a perspective where the main subjects appear to align diagonally.
iphone-photography-tips-32
In the photo above, including the ferns in foreground creates diagonal balance with the cliff-face in the background.
And in the photo below, the boat in the foreground balances diagonally with the boat in the background.
iphone-photography-tips-25
You can even use leading lines to create diagonal balance in your photos. Notice how the foamy water in the bottom left of the image below gradually leads diagonally towards the hill at the top right.
iphone-photography-tips-19
Once you train your eye to notice diagonal compositions, your photos will appear more balanced and harmonious – ultimately making them more engaging and interesting to look at.

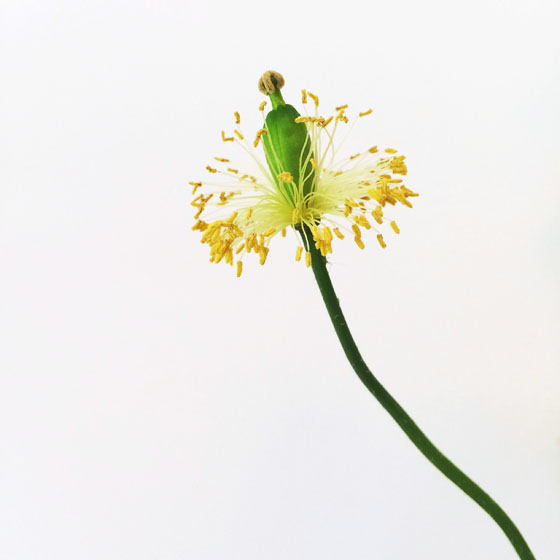
5. Capture Close-Up Detail

One of the biggest mistakes that people make when taking photos is not getting close enough to the subject.
If you shoot from too far away, you’ll never be able to capture the amazing details, colors and textures that will really bring your photos to life.
iphone-photography-tips-46
This is particularly important when photographing objects with intricate details like flowersleaves, water droplets and textured subjects.
iphone-photography-tips-42
It’s also a good technique to use in portrait photography. Getting close allows you to capture your subject’s facial features and emotions – which will give your photo far more impact.
IMG_0181
This works when photographing both people and pets. So be sure to get down to the level of your subject and don’t be afraid to get in close.
iphone-photography-tips-49
Keep in mind that your iPhone won’t be able to focus properly if the lens is too close to your subject.
If you want to capture extreme close-ups of tiny detail, you’ll need to use an add-on macro lens which allows you to focus very close to the subject.
iphone-photography-tips-45
There are many different macro lenses on the market. OlloclipMoment and Zeiss Exolens are three popular lens manufacturers that you might want to check out.
Of course, for genres like landscape photography, you’ll be photographing distant scenes. However, including some close-up detail in the foreground is a great way of adding extra visual interest and a stronger sense of depth.
iphone-photography-tips-43
So don’t be afraid to get up close to objects in the foreground when you’re shooting scenery. It might make all the difference to your photo!

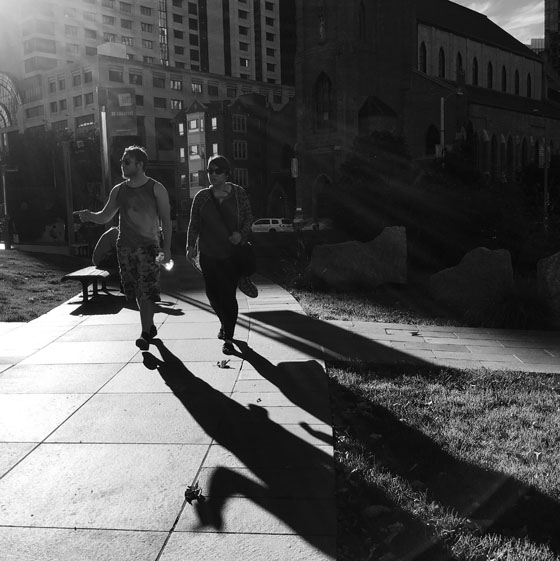
6. Include Shadows In Your Composition

When the sun is low in the sky, the long shadows cast by your subjects are often more interesting than the actual subjects themselves.
Processed with VSCOcam with b3 preset
Photographing shadows can add a wonderful sense of mystery and intrigue to your images. And they’re great for adding visual interest to the foreground of your composition.
iphone-photography-tips-53
The longest shadows are created when the sun is very low in the sky. So shooting during the golden hour of sunrise or sunset is the best time to take these kinds of photos.
Shooting with the sun in front of you will ensure that the shadows appear in the foreground of the photo.
iphone-photography-tips-52
To ensure the shadows are prominent in your picture, you might need to manually adjust the exposure so that the shadows appear dark enough.
To do this, start by tapping to set focus in the camera app, then swipe down on the screen so that the shadows appear nice and dark.
If necessary, you can further darken the shadows and increase contrast in post-processing by using an app such as Snapseed.
iphone-photography-tips-50
Shadows can create stunning abstract images, so keep your eyes peeled for interesting shadow patterns created by railings, trees and other objects.
When photographing shadows you can include both the subject and their shadow in the frame, or just photograph the shadows for a more unique and abstract shot.

7. Take Silhouette Photos

A silhouette is the dark shape of an object taken against bright light. Silhouetting is one of the most interesting iPhone photography techniques, and it’s actually very easy to achieve.
iphone-burst-mode-18
To shoot an incredible silhouette photo with your iPhone, all you need to do is find an interesting subject (such as a person) and shoot towards the light source.
To ensure your silhouette appears dark enough, tap to set focus, then swipe down to reduce the exposure if necessary. You can always darken the silhouettes a bit more using an editing app if you need to.
iphone-photography-tips-55
Silhouetting works best when the sun is low above the horizon. Shooting during the golden hour has the added advantage of you being able to use the beautiful colored sky as your background.
iphone-photography-tips-12
While sunrises and sunsets offer the perfect opportunity to take silhouette photos, you can create them wherever there’s a light source behind the subject.
For example, if you’re shooting indoors, you could place your subject in front of a window or lamp to create a silhouette.
In the photo below, I was even able to create a silhouette by using the reflected light from the floor tiles.
iphone-photography-tips-56
Silhouettes create incredibly eye-catching and dramatic images, so this might be one of the best iPhone photography tips that you learn today.

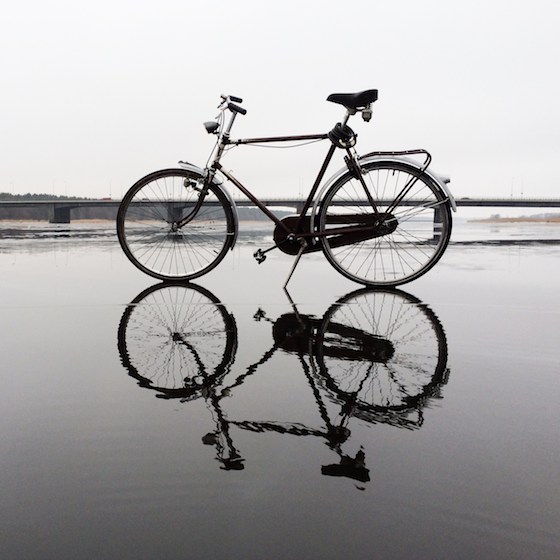
8. Photograph Reflections

Reflections make wonderful iPhone photography subjects. You can find reflections on many different surfaces including glass, shiny cars, and ice – but water is probably the best surface for reflection photography.
iphone-photography-tips-8
Unlike mirrors, the ripples and waves on the water’s surface can distort reflections to create a beautiful painterly effect.
To create this kind of reflection photo, hold your iPhone just an inch above the surface of the water.
IMG_1598
If there aren’t any waves, you can always create them yourself by moving your hand through the water. The photo below was taken just after the water was deliberately disturbed.
Processed with VSCOcam with s2 preset
In most cases, it looks best if you include both the reflection and the reflected object in your composition. This is because the symmetry created has a very strong visual impact.
However, in some cases, photographing just the reflection can create a beautiful abstract image. The photo below captures just the reflections of the trees and sky in the rippled water of a river.

iphone-photography-tips-54

Once you start paying attention, you’ll notice that reflections are everywhere – and they’ll look really great in your photos!

9. Use Symmetry

In photography, the word symmetry describes an image in which both halves are identical (or almost identical).
Reflections provide an easy way to create symmetrical images. If you position the line of symmetry across the center of the frame, the top and bottom halves of the photo will be symmetrical.
iphone-photography-tips-9
But of course, reflections are just one way to create symmetrical compositions. Architecture and other man-made objects (such as the building and bench in the photo below) are often designed to be symmetrical.
iphone-photography-tips-69
Look out for symmetrical scenes and subjects, and don’t be afraid to place them in the middle of the photo to really make the symmetry obvious.
It’s true that basic composition guidelines such as the rule of thirds don’t suggest placing your subjects in the center of a composition. However, sometimes rules are made to be broken!
iphone-photography-tips-58
You can’t argue with the dramatic effect you can create with symmetry and central composition.

10. Enhance Your Photos With VSCO Filters

Entire books have been written about the topic of photo editing. But you don’t need high-end editing skills or technology to add beauty or drama to your iPhone photos.
iphone-photography-tips-62
The easiest way to apply powerful yet subtle effects to your photos is to use the preset filters in the VSCO app.
Open the VSCO app, tap the plus icon (+) at the top left of the screen, and import the photo you want to edit.
iphone-photography-tips-67
Now tap the Edit icon (two sliders) at the bottom of the screen, then select a filter from the options at the bottom.
To reduce the intensity of the filter, tap on the filter name, then drag the slider to the left. Tap the circle when you’re happy with the effect.
To save the edited image, tap the small arrow beneath the list of filters, then tap the circle at the bottom right.
iphone-photography-tips-68
On the next screen, tap the three dots icon at the bottom right, select Save To Camera Roll, then select Actual Size.
VSCO presets allow you to apply beautiful filters that enhance your photo in seconds. Because the filters are quite subtle, it makes it very difficult for you to over-edit your photos.
iphone-photography-tips-65
Whether you want to create classic black and white pictures, crisp clean edits, or faded vintage photos, there’s plenty of filters to choose from.
While VSCO does offer more complex photo editing tools, you don’t need any technical knowledge to create amazing edits with the VSCO presets. And the VSCO app is even free to download!